The Trick That Feels Wrong
You’re at the eyepiece. Someone says “can you see the galaxy?” You look. Nothing. They say “try looking slightly to the side of it.” You do — and there it is, a faint smear of light that vanishes the moment you look directly at it.
This is averted vision, and it works because of something specific about the anatomy of your eye. Understanding why it works will make you a better observer immediately.
Two Kinds of Detector
Your retina contains two types of photoreceptors: cones and rods. They do completely different jobs.
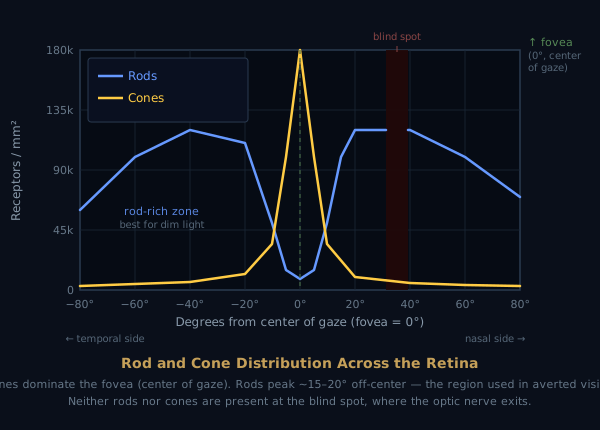
Cones are concentrated in a small central pit called the fovea — the point on your retina that corresponds to whatever you’re looking directly at. Cones handle color vision and fine detail. They’re what you use to read, recognize faces, and see in daylight. They need a reasonable amount of light to function.
Rods are distributed across the rest of the retina, with peak density roughly 15–20° away from the fovea. They’re far more sensitive to dim light than cones, but they have no color discrimination and they can’t resolve fine detail. In a dark field, they’re the detectors you want.
When you look directly at a faint object, its light falls on the fovea — the cone-packed center. In dim conditions, those cones barely register it. The object appears to vanish. But when you shift your gaze 10–15° to one side, the light from that object now falls on the rod-rich periphery of your retina — and it becomes visible.
Dark Adaptation
Rods don’t switch on instantly. When you walk from a lit room into the dark, your eyes begin a gradual process of adaptation that takes much longer than most people expect.
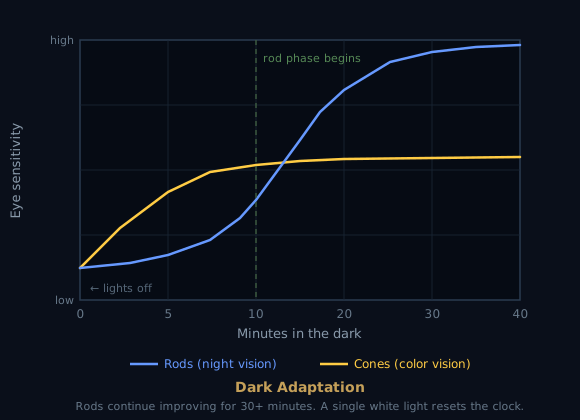
The chemistry involves a pigment called rhodopsin. In bright light, rhodopsin breaks down — it gets “bleached.” In the dark, it regenerates. Fully regenerated rhodopsin makes your rods dramatically more sensitive, but regeneration takes time: about 30–40 minutes for full adaptation.
The adaptation curve has two phases. In the first 7–10 minutes, your cones adapt — useful, but limited. Then around the 10-minute mark, rods take over and sensitivity continues to rise steeply. What you can detect at 40 minutes in the dark is measurably different from what you could detect at 10 minutes.
The practical consequences: arriving at the eyepiece, glancing at your phone, and then immediately expecting to see faint objects is a losing strategy. That white screen reset your clock. Give yourself 20–30 minutes of genuine dark time before judging what you can or can’t see.
Red Light
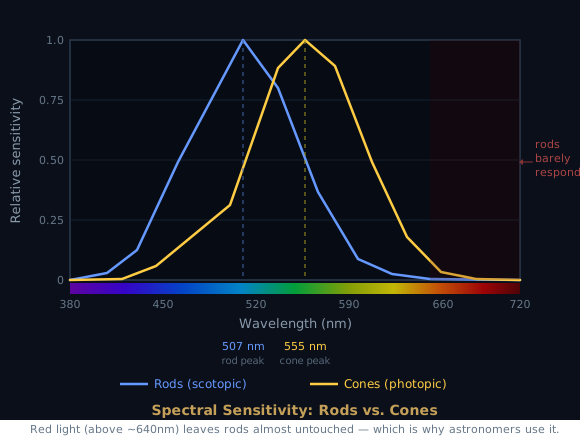
Rods are sensitive to blue-green wavelengths but respond very weakly to red light above about 640nm. This is why astronomers use red-filtered torches: red light lets you read a star chart or adjust equipment without bleaching your rhodopsin and destroying your dark adaptation. White light, even briefly, can set you back 10–15 minutes.
Not all red lights are equal. Wavelength matters — a deep red (650nm+) is much safer than an orange-red (620nm), which still activates rods enough to cause partial bleaching. Brightness matters just as much: a dim deep-red LED is fine; a bright one at the same wavelength will still set you back. The test is simple — if it’s bright enough to cast a visible shadow, it’s too bright for serious observing.
Dedicated astronomy red lights are widely available and inexpensive, but a decent DIY solution is a white torch with a few layers of red film or a piece of red candy wrapper over the lens. If your phone has a red or “night mode” display setting, that’s useful for quick chart checks, though most phone screens are still bright enough to cause some adaptation loss — keep the brightness as low as it will go.
If you’re briefly caught needing white light — dropping something, checking equipment — cover one eye. You’ll sacrifice the adaptation in one eye, but the other will be ready to go the moment the light goes off.
Observing Tips for Dark Adaptation
Knowing how dark adaptation works is only half the job — the other half is arranging your observing sessions so it can actually happen.
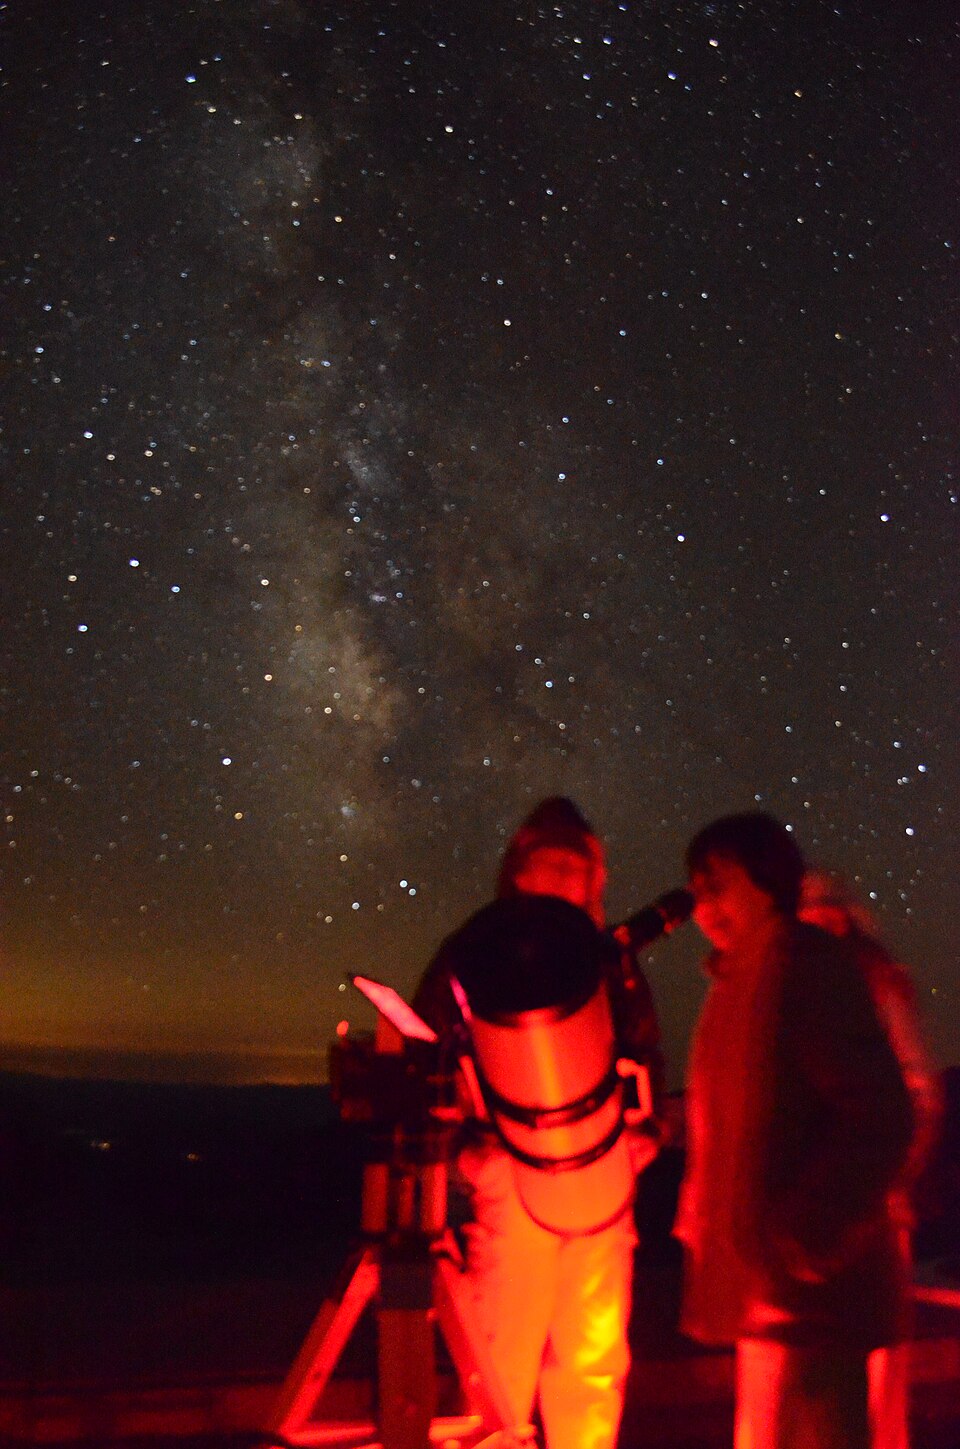
Arrive before you need to. If you’re planning to observe faint objects, you want to be dark-adapted when the sky gets interesting — not when you arrive. Budget 30–40 minutes of genuine dark time before you start pushing for difficult targets. Arriving at the site just as astronomical twilight ends and immediately pointing at a faint galaxy is starting the game at a disadvantage.
Let your scope cool down at the same time. A telescope brought from a warm room into cool night air produces thermal currents in the tube that degrade the image until it equilibrates — usually 20–40 minutes depending on the design and temperature difference. That cooldown period and your dark adaptation period overlap almost exactly. Use one to accomplish the other.
Treat your phone as white light. Even in “night mode” or with a red filter app, most phone screens are bright enough to cause measurable adaptation loss. If you need to check a chart, keep brightness at minimum, look briefly, and look away. Better: download your charts in advance and print them, or use a dedicated astronomy app with a genuine deep-red display mode.
Don’t judge what you can see too soon. The most common mistake at a star party is spending 5 minutes under dark skies, concluding that some faint object “isn’t there,” and moving on. Forty minutes later, the same observer would likely have seen it. Give your eyes time to catch up to the sky.
Use a friend’s eyes as a calibration. If someone else at the eyepiece can see something you can’t, that’s useful information — either you need more dark adaptation time, or you need to work on your averted vision technique. Either way it’s not the sky’s fault.
Averted Vision in Practice
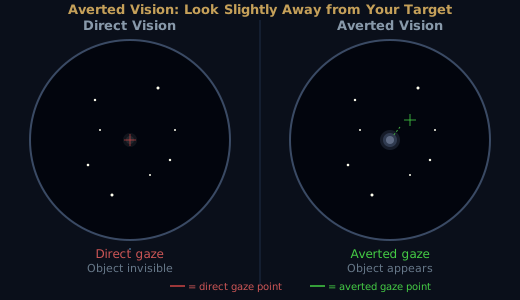
When using averted vision, a shift of about 10–15° from the target is usually most effective. The direction matters less than the distance — experiment with shifting up, down, or to one side to find what works for you. Many observers find shifting toward the nose slightly more effective, since the averting in that direction moves the object’s image away from the part of the retina where the optic nerve exits, which has no photoreceptors at all. But individual variation is real; experiment with up, down, and both sides.
Two other tricks help at the threshold of visibility. Tapping the focuser or gently nudging the scope produces a brief movement — your peripheral vision is particularly good at detecting motion, and a fleeting object often snaps into view this way. And blinking deliberately can help reset whatever the eye is doing when it “loses” the object.
The moment you look directly at a threshold object to confirm it, it will likely disappear again. That’s not your imagination. That’s the fovea.
Pupil Size, Age, and the Telescope
There’s another variable that affects how much light your eye can collect, and it changes over a lifetime: the maximum diameter of the dark-adapted pupil.
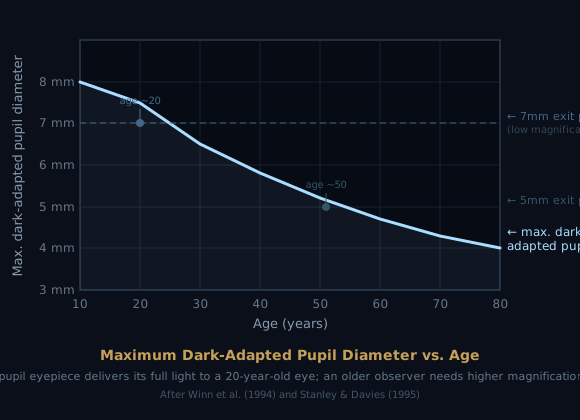
At age 20, a dark-adapted eye can open to roughly 7–8mm. By 50, that figure is closer to 5mm; by 70, around 4mm. This matters for telescope use because of a quantity called the exit pupil — the diameter of the beam of light that leaves the eyepiece and enters your eye. Exit pupil is simply your telescope’s aperture divided by the magnification in use.
A 200mm telescope at 25× produces an exit pupil of 8mm. That’s wider than anyone’s dark-adapted pupil — meaning light collected by the outer ring of the objective never makes it into the eye. You haven’t gained anything from that aperture at that magnification. Pushing to 40× brings the exit pupil to 5mm, which suits a 50-year-old observer well but still leaves room for a younger observer to drop the magnification further.
The practical upshot: if you’re using a wide-field, low-power eyepiece and the view seems no brighter than a higher-power one, your exit pupil may be larger than your pupil. This becomes more relevant as observers age. A 5mm exit pupil that was comfortable at 30 may be delivering diminishing returns at 60.
None of this argues against low magnification — there are many reasons to use it beyond raw brightness. But it’s worth knowing that the optimal exit pupil is not the same for every observer, and it shifts across a lifetime.
Patience Pays
None of what’s described in this article requires special equipment — no eyepiece upgrade, no tracking mount, no software. Just time in the dark and knowing where to look — which is, at least occasionally, slightly to the side of the thing you’re trying to see.